Flutter BLoC State Management:
What is State?
A state is information that can be read when the widget is built and might change or modify over the lifetime of the app. The setState() function allows us to set the properties of the state object that triggers a redraw of the UI.
What is State Management?
State management is one of the most popular and necessary processes in the lifecycle of an application. By official documentation, Flutter is declarative. It means Flutter builds its UI by reflecting the current state of your app.
To manage the large size of applications we must need to manage states. There are many state management libraries in flutter such as Provider, BLoC, Redux, GetX Etc.
In this blog, we will talk about BLoC Architecture.
What is BLoC?
BLoC stands for Business Logic Component. It is a design pattern and architectural concept that is widely used for state management in Flutter applications. BLoC helps in separating the business logic from the UI layer, making the code more modular, reusable, and easier to test.
In the BLoC pattern, the business logic of the application is encapsulated within a BLoC class. The BLoC class acts as a mediator between the UI layer and the data layer, handling the processing of events and emitting corresponding states.
The Basics of BLoC Pattern in Flutter
The BLoC (Business Logic Component) pattern is a methodology designed to manage state and business logic in Flutter applications. It helps separate the presentation layer from business logic, ensuring that the UI reacts to state changes rather than dictating or managing the state.
Core Components of the BLoC Pattern:
- Events: Triggered by the user interface, events are the input for a BLoC. They can be things like user interactions or lifecycle events.
- States: The output of a BLoC. The state represents a part of your app's state at a particular moment.
- BLoC: The business logic component that receives events and produces states. It's where the business logic of your application resides.
How the BLoC Pattern Works:
- User Interaction: Begins with a user interaction, such as a button press.
- Event Dispatch: This interaction dispatches an event to the BLoC.
- State Generation: The BLoC processes the event and yields a new state.
- UI Update: The UI listens to the BLoC and updates accordingly when a new state is emitted.
In Flutter, implementing the BLoC pattern involves using specific Flutter BLoC library components, like BlocBuilder and BlocProvider, to connect the UI with the BLoC logic. For instance, BlocBuilder is a widget that builds itself based on the latest state of a BLoC. It listens to the BLoC state stream and re-renders whenever the state changes.
Here’s a basic example of implementing the BLoC pattern in Flutter:
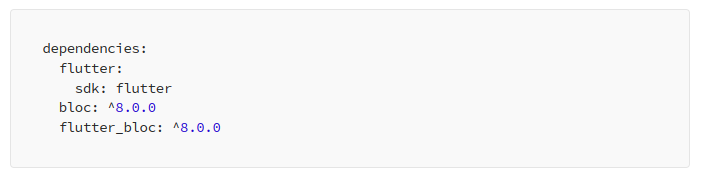
- First, make sure you have the
blocandflutter_blocpackages added to yourpubspec.yamlfile:
Next, let’s create a simple counter application using BLoC.
2. Create the CounterBloc class that extends the Bloc class from the bloc package:
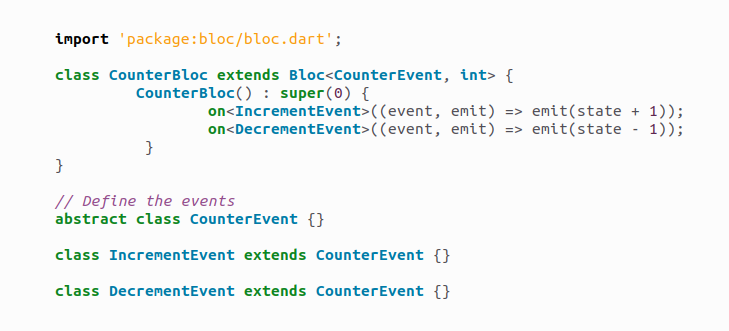
CounterBloc:
- We define a class
CounterBlocthat extends theBlocclass from theblocpackage. - This class manages the state and implements the logic for handling events and emitting new states.
- The initial state of the counter is set to 0 (
super(0)). - The
CounterBlocclass is a BLoC that manages an integer state. - IncrementEvent: When this event is received, the state is incremented by 1.
- DecrementEvent: When this event is received, the state is decremented by 1.
- The
on<Event>method is used to register event handlers, defining what should happen when each type of event is added to the BLoC. Theemitfunction is used within these handlers to update the state of the BLoC.
CounterEvent:
- We define two event classes:
IncrementEventandDecrementEvent. - These classes are used to represent the events that can occur in our application.
3. Create the UI using Flutter widgets:
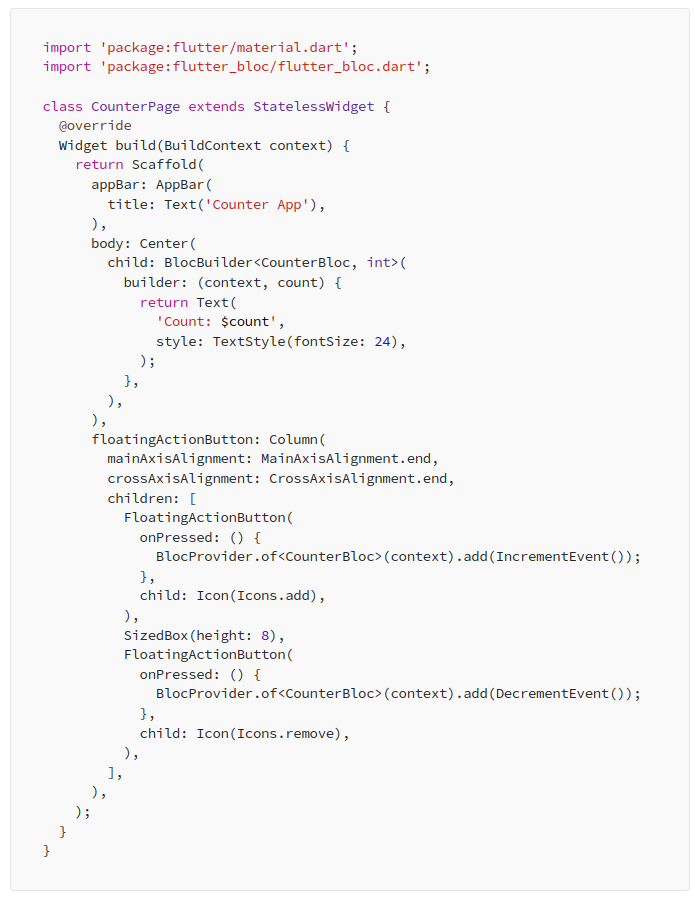
CounterPage:
- This is the UI component of our counter application.
- It extends
StatelessWidgetand provides the visual representation of the counter. - The
BlocBuilderwidget is used to listen to state changes from theCounterBloc. - It rebuilds the UI whenever a new state is emitted by the bloc.
- The current count value is displayed using the
Textwidget. - The two
FloatingActionButtonwidgets are used to dispatch theIncrementEventandDecrementEventwhen pressed. - These buttons access the
CounterBlocusingBlocProvider.of<CounterBloc>(context)and dispatch the respective events.
4. Finally, create the main app and instantiate the CounterBloc:
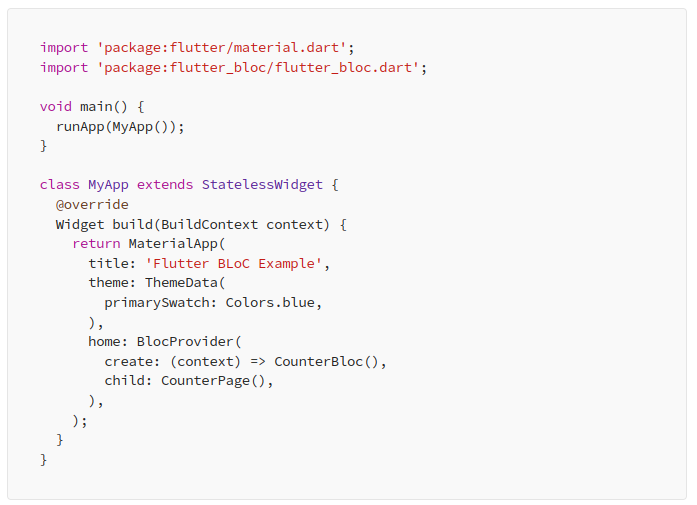
MyApp:
- This is the entry point of our application.
- We wrap the
CounterPagewith aBlocProviderwidget, which provides theCounterBlocinstance to its descendants. - The
CounterBlocis created usingcreatemethod, which instantiates theCounterBlocclass. - The
CounterPageis the child widget that has access to theCounterBlocinstance.
When the application starts, the CounterPage widget is displayed. It receives the CounterBloc instance from the BlocProvider. The BlocBuilder widget listens to state changes from the CounterBloc and rebuilds the UI whenever a new state is emitted.
When the user presses the ‘+’ button, an IncrementEvent is dispatched to the CounterBloc. The mapEventToState method in CounterBloc handles this event, increments the current state by 1, and emits the updated state. The UI rebuilds, displaying the new count value.
Similarly, when the ‘-’ button is pressed, a DecrementEvent is dispatched to the CounterBloc, and the state is updated accordingly.
This way, the BLoC pattern separates the business logic (CounterBloc) from the UI (CounterPage), enabling efficient state management and reusability.
Bloc offers more features, including cubits, BlocListeners, MultiBlocProviders, and more. For additional information, please refer to the Bloc documentation.